JRebel for Cloud in Visual Studio Code
This section lists the steps required to set up JRebel for Cloud on Visual Studio Code. You must have an activated JRebel installation in your IDE. For more information, see how to install and configure JRebel for Visual Studio Code.
Important
JRebel Remoting does not support multiple developers syncing to the same module on a shared remote server. After each sync, the remote server’s code state for that module is replaced entirely by the workspace of the developer who performed the sync. Changes from any previous developers’ syncs are discarded.
Recommendation:
Assign one developer per module for remote sync. If a team owns a module, only one team member should sync it at a time.
Teams sharing a remote server across multiple modules should keep their modules backward-compatible and communicate breaking changes between module owners.
1. Enable JRebel remote server support on the server
Running JRebel on a remote server requires the JRebel agent and a launch parameter. Follow the instructions:
Download the standalone JRebel archive and extract its contents. Upload the contents to the remote server.
Add
-agentpath:[/path/to/]JRebel libraryattribute to the server startup parameters. Select the correct JRebel library based on the remote server operating system and architecture (see Launch from Command Line). This ensures that JRebel is started with the server.Add the
-Drebel.remoting_plugin=trueattribute to the server startup parameters.
Following is an example of a server startup script with both JRebel (Windows 64-bit) and remote server feature enabled:
-agentpath:[/path/to/]libjrebel64.dll -Drebel.remoting_plugin=true
Enabling password authentication
To enable JRebel password authentication on the server, use the -set-remote-password <NewPassword> CLI command. Ensure that all connecting JRebel IDE plugins are configured with the same password for successful synchronization.
Note
Use the following parameter to remove the password from the server: java -jar jrebel.jar -disable-remote-password
How do I know this works?
Once you have successfully configured JRebel remote server support for your remote server, you should see the following banner during remote server startup:
2024-04-02 14:23:55 JRebel:  #############################################################
2024-04-02 14:23:55 JRebel:
2024-04-02 14:23:55 JRebel:  JRebel Agent 2024.1.0 (202001051049)
2024-04-02 14:23:55 JRebel:  (c) Copyright 2007-2024 Perforce Software, Inc.
2024-04-02 14:23:55 JRebel:
2024-04-02 14:23:55 JRebel:  JRebel started in remote server mode.
2024-04-02 14:23:55 JRebel:
2024-04-02 14:23:55 JRebel:  #############################################################
2. Add a remote server to Visual Studio Code
Important
A JRebel Remoting sync operation targets a single remote server (JVM) at a time. There is no built-in mechanism to broadcast or fan out a single sync to multiple JVMs simultaneously.
Recommendation (for clustered or Kubernetes environments):
Configure one remote server entry per JVM (pod) in your IDE plugin. Each entry should point to a stable, dedicated endpoint. For example, one Kubernetes Service per pod, with a fixed hostname and port.
These entries can be configured at the workspace level. No project- or module-level configuration is required, unless you need to control which modules sync to which servers.
When Synchronize on build is enabled, each build will sync to all configured remote servers, effectively achieving fan-out.
Do not rely on a TCP load balancer to distribute sync requests across backend JVMs. A load balancer will route each sync to only one backend instance, meaning the other instances will not receive the update. Direct, pinned connectivity to each JVM is required.
Important
JRebel Remoting requires direct, pinned connectivity to each target JVM.
Placing a TCP load balancer between the IDE and your backend JVMs is not supported, regardless of whether sticky sessions or session affinity are enabled. A load balancer will route each sync request to only one backend instance. The other instances behind the LB will not receive the code update. There is no mechanism for a standard load balancer to propagate sync requests to all backend instances and merge their responses.
Recommendation (for clustered or Kubernetes environments):
Create one stable endpoint per JVM. For example, one Kubernetes Service per pod (managed server), each with a fixed hostname and port.
Configure each endpoint as a separate, remote server entry in the IDE plugin.
Do not point the IDE at a cluster-level or load-balanced endpoint.
Adding a remote server enables the JRebel IDE plugin to communicate with the JRebel agent running on the server, allowing your changes to sync over the network to the remote server. To add a remote server:
Open the JRebel view. Under Workspace Settings, select Remote Server.
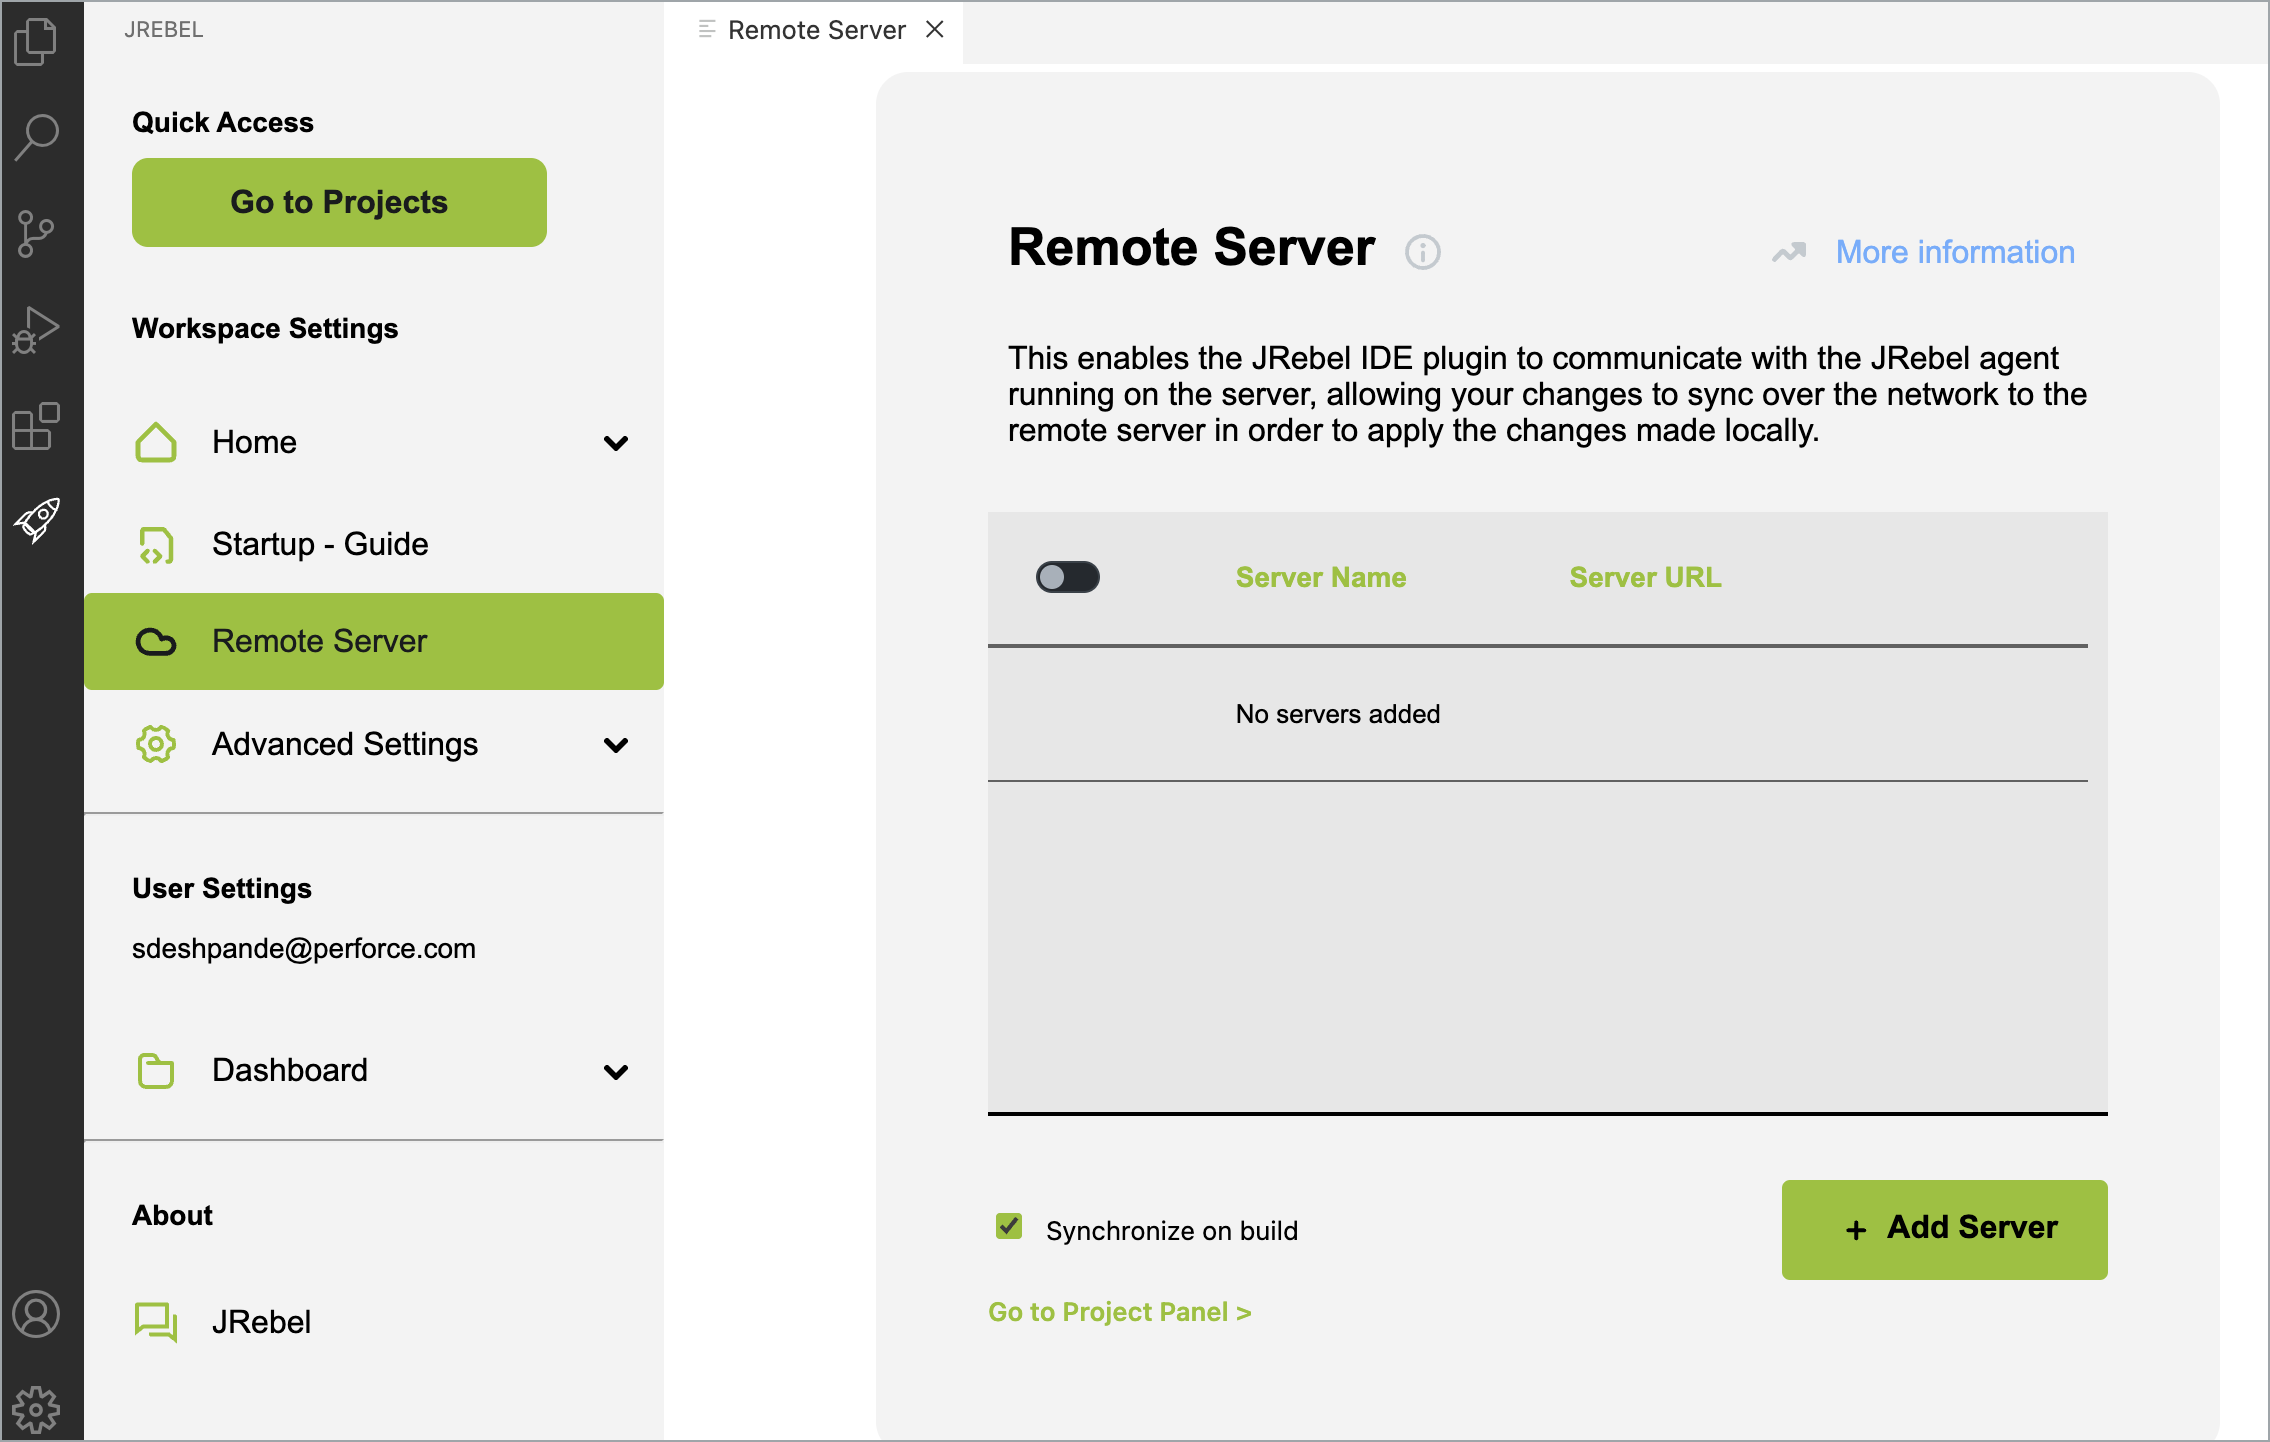
Click Add Server.
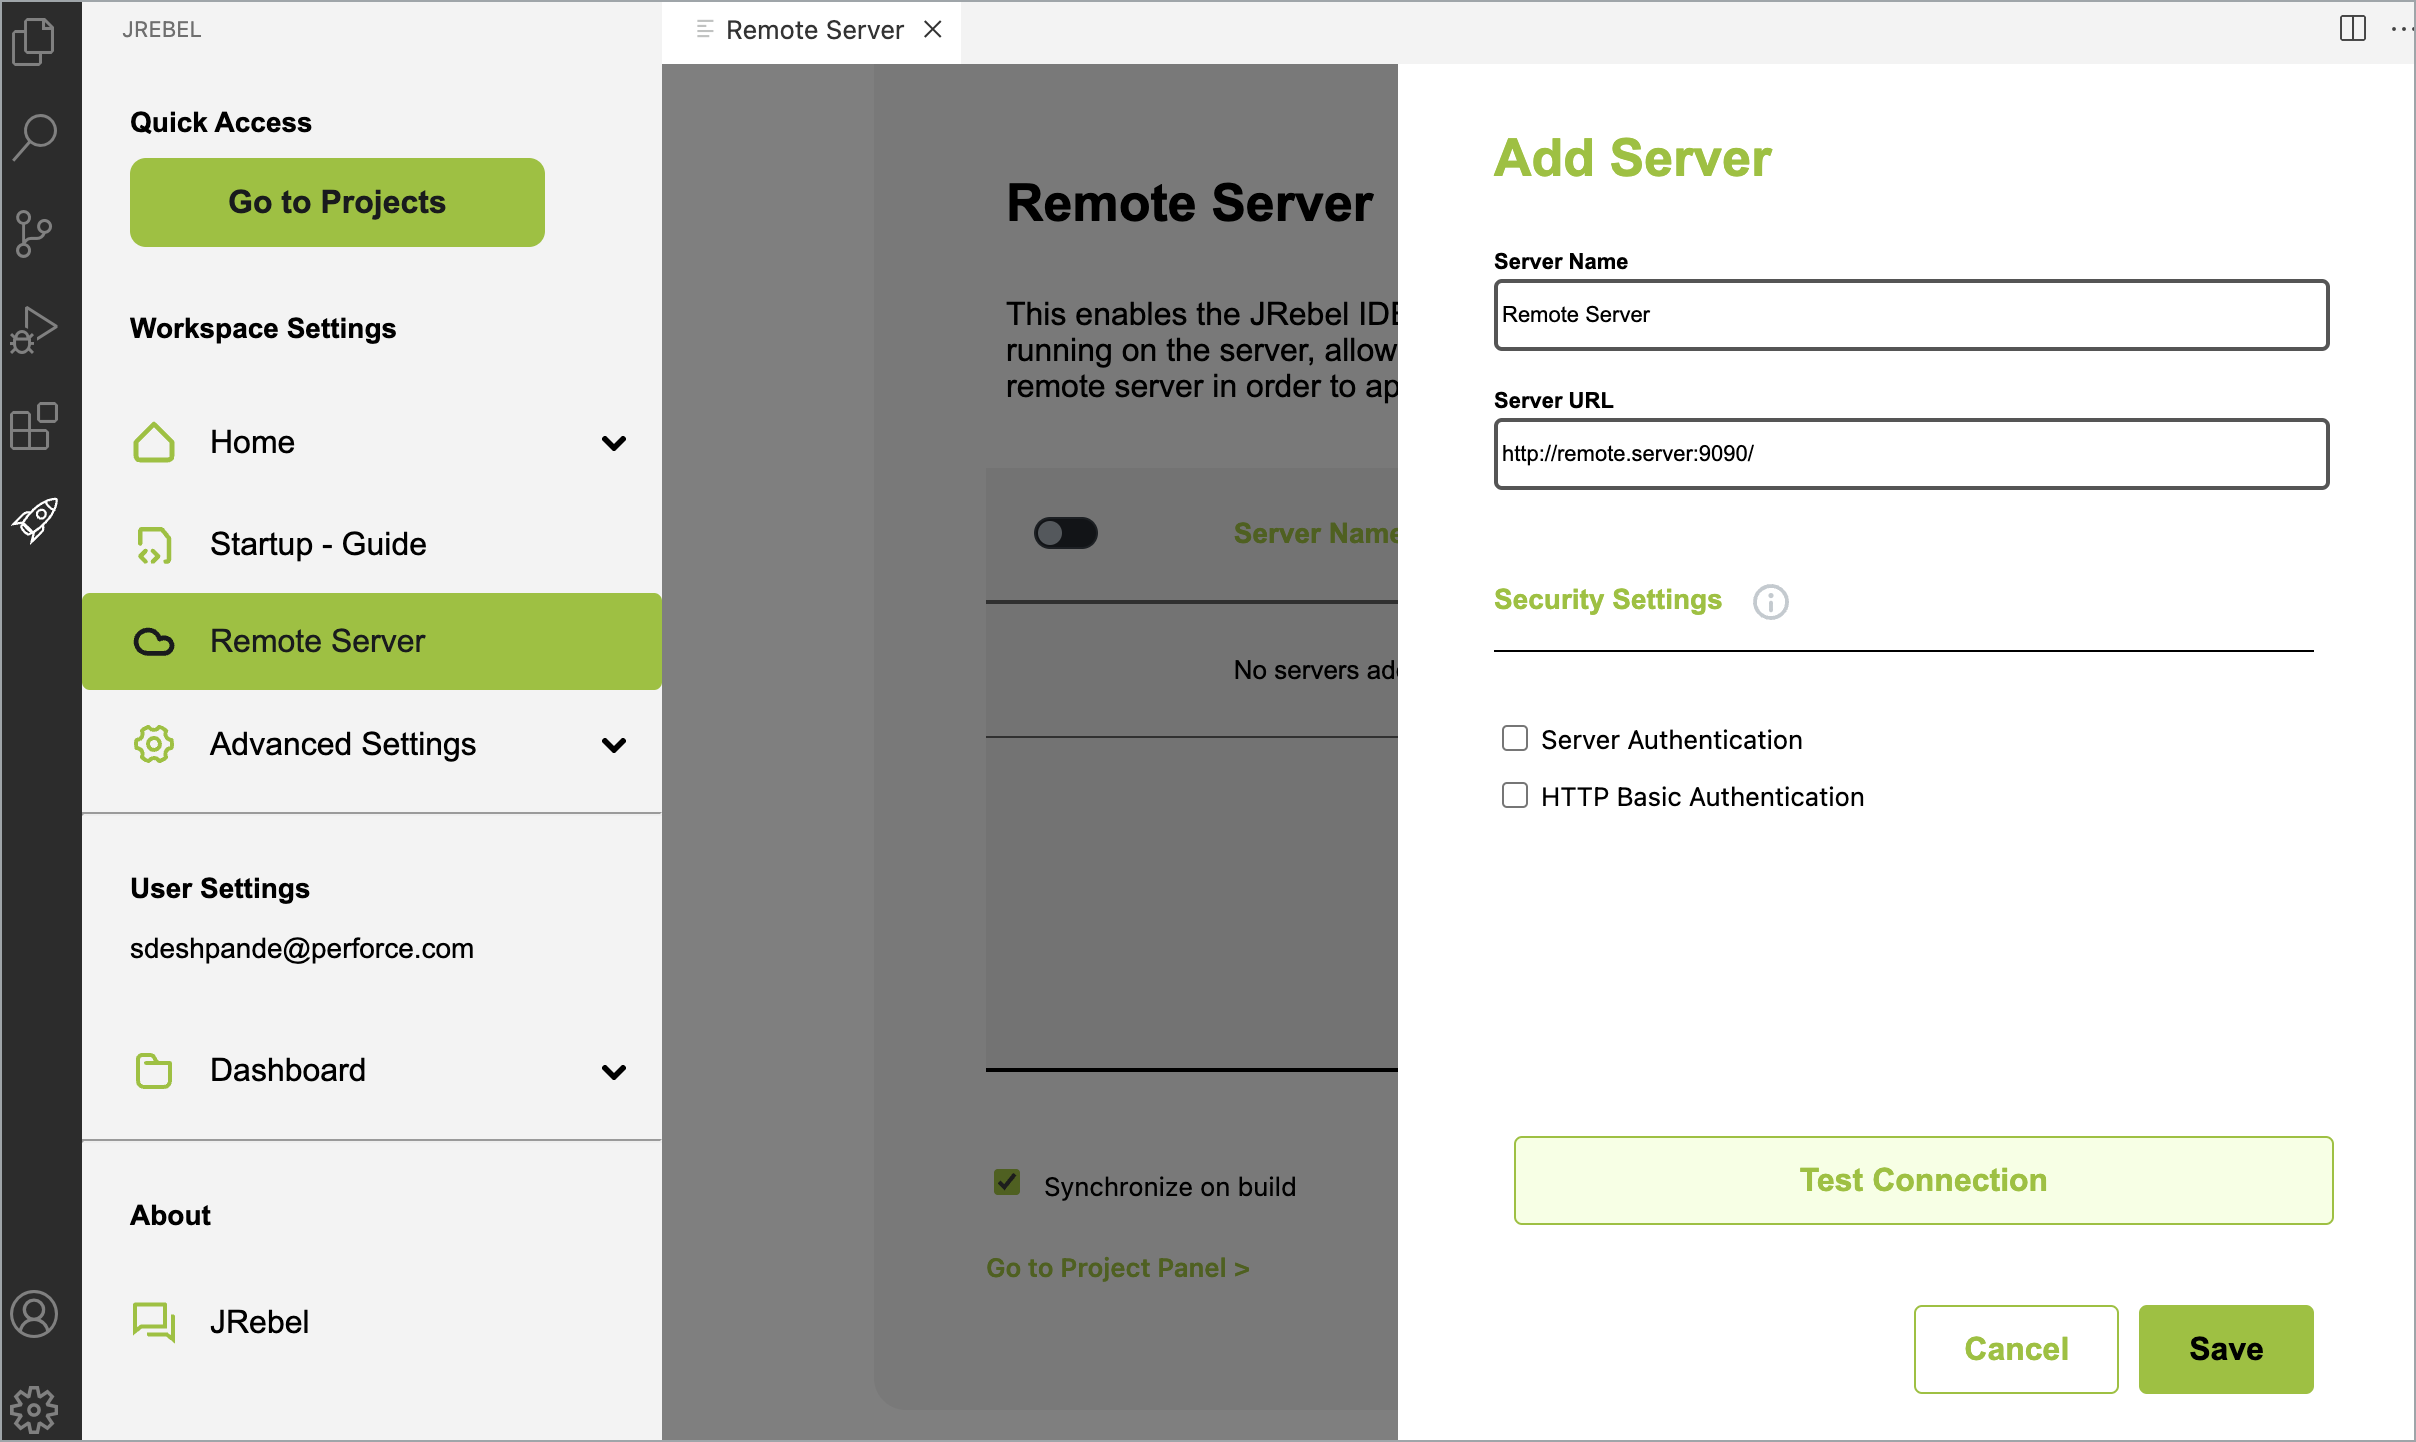
Provide the following information:
Server Name – Provide a name for the remote server.
Server URL – Provide the full URL for the server.
To enforce server security, provide the authentication under Security Settings using:
Server Authentication – Enable additional synchronization security. Specify a simple alphanumeric password. The password also needs to be set on the server by using the command:
java -jar jrebel.jar -set-remote-password <NewPassword>HTTP Basic Authentication – Enable HTTP authentication for a remote server by providing username and password.
Click Test Connection to test the server URL. This test will ping the server for JRebel, verifying the correct version.
Click Save.
This server can be used by all projects in Visual Studio Code. Multiple remote servers can be added and used simultaneously. To automatically synchronize changes with remote servers when compiling, select Synchronize on build on the Remote Server page.
3.Configure projects for remote server support
Go to JRebel
 > Home > Project Panel or JRebel > Go to Projects.
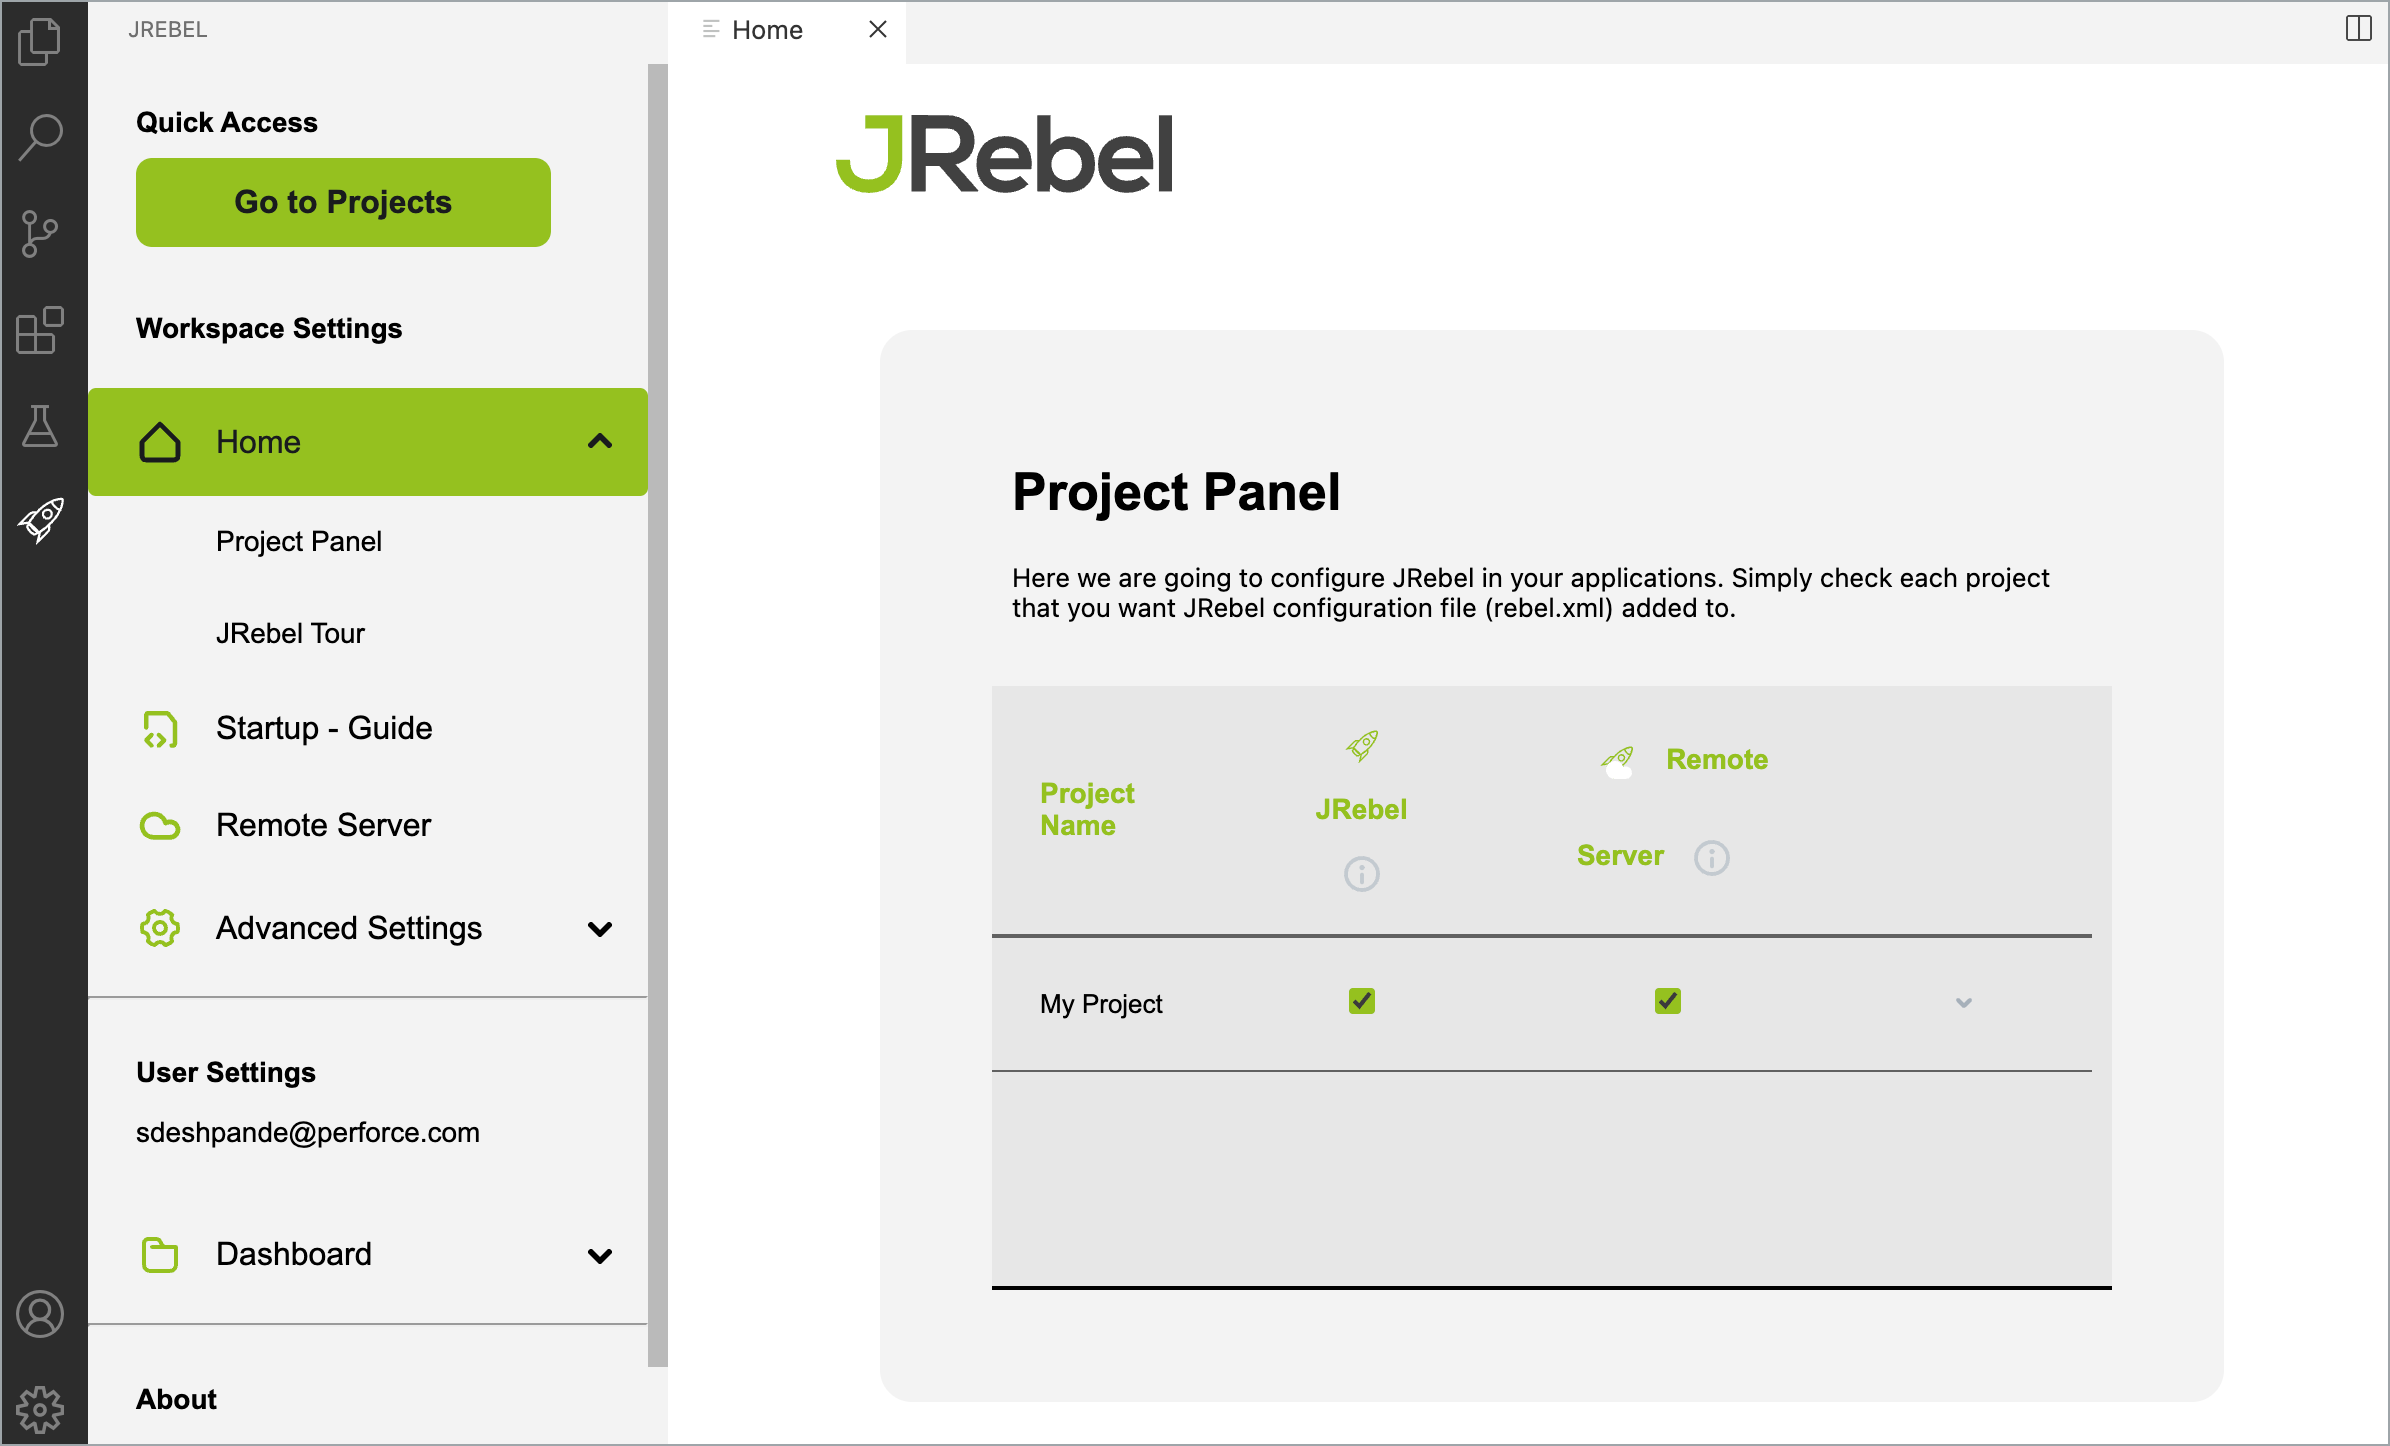
Select the checkbox for your project. The configuration file
rebel-remote.xmlis created in the project resources folder.Build and redeploy your application containing the
rebel-remote.xmlconfiguration file to the remote server.
Tip
By default, all configured projects inherit the workspace server settings.
To configure a project with a custom remote server setup, open JRebel > Home > Project Panel, select the project, and open the Remote Servers tab in its configuration. The following options are available:
Off – No remote server synchronization functionality is applied to the project.
Use active remote servers – Once remote servers have been defined on the Remote Server page and enabled there, all active remote servers will be used for synchronization of this project. This option provides a simpler configuration when working with just one remote server or when the project is deployed to all remote servers.
Select specific remote servers for this module – Select or deselect remote servers in the project configuration to enable them for the project. This project will be synchronized only with the selected servers. Changes made on the Remote Server page do not affect projects using this configuration.
4. Synchronize with the server
Click the ![]() synchronization checkbox against a project to manually synchronize your workstation and remote servers. To synchronize all projects between your workstation and a remote server, go to Explorer > Java Projects and then click the
synchronization checkbox against a project to manually synchronize your workstation and remote servers. To synchronize all projects between your workstation and a remote server, go to Explorer > Java Projects and then click the ![]() icon.
icon.
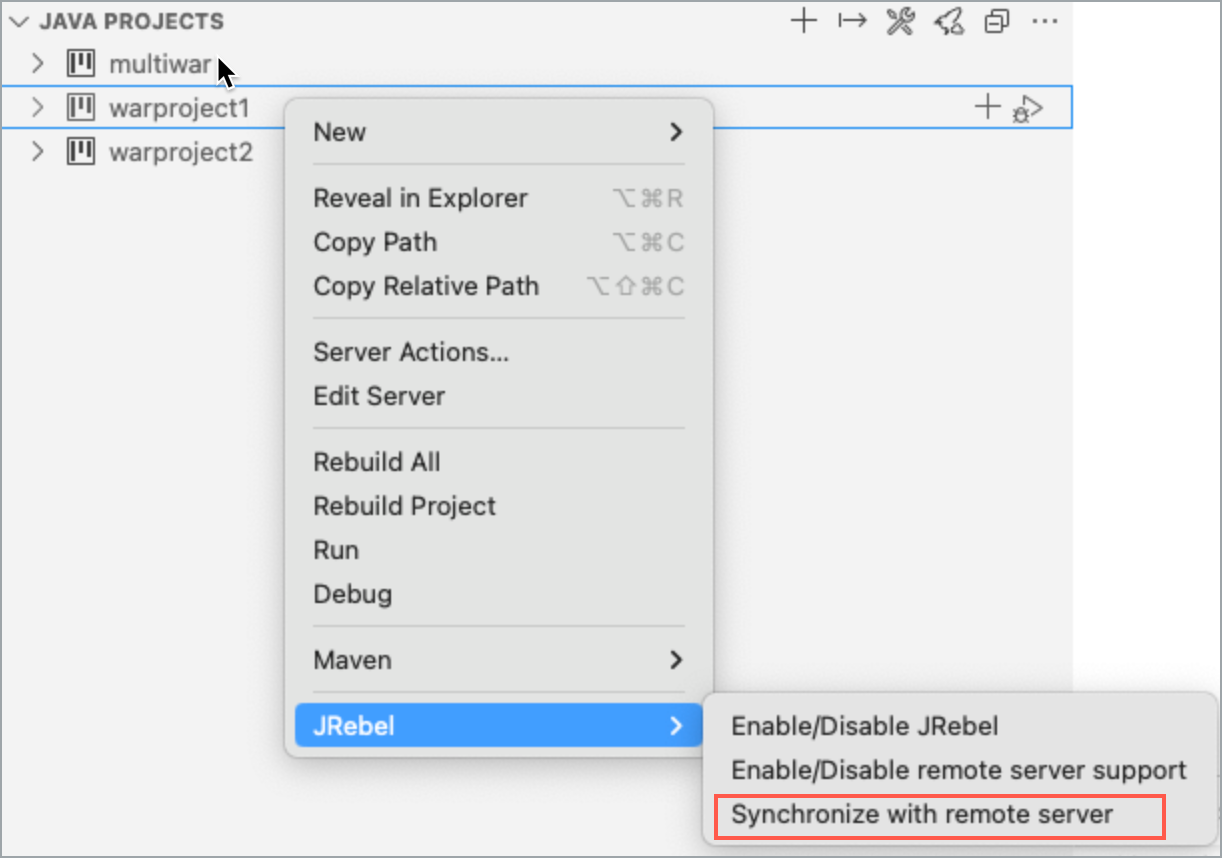
You can also right-click the desired project node in the project explorer to synchronize an individual project. Go to Explorer > Java Projects and right-click the desired project node and then select JRebel > Synchronize with remote server.