Installation and activation
Tip
Using Eclipse? Get the JRebel and XRebel for Eclipse plugin instead.
Using IntelliJ? Download the JRebel plugin. It now includes XRebel!
Download and setup
Download the XRebel archive from https://www.jrebel.com/products/xrebel/download/.
Extract the archive to a location of your choice. You will end up with these files:
3rd-party-licenses.txt
Changelog.txt
License.txt
readme.txt
xrebel.jar
xrebel.lic
Add the following parameter to JVM arguments for the application server. Make sure the path that you refer to contains the
xrebel.jarfile:
-javaagent:[path/to/]xrebel.jarUsing multiple agents in the same JVM process? You need to specify the
-javaagentparameter for every agent:-javaagent:[path/to/]xrebel.jar -javaagent:[path/to/]jrebel.jarConsider increasing memory available to the JVM when using multiple agents.
And you are done! Launch your server and application. The XRebel toolbar should now appear within your browser window.
Note
Need more help with configuring the XRebel launch? Adding XRebel via IDE and on application servers.
Your application does not have a front-end? Maybe you cannot inject the toolbar into the application? Use the XRebel Standalone UI feature.
License activation
When launching an application with XRebel, you will see this banner in the console:
XRebel: ################################################################
XRebel:
XRebel:  XRebel Agent 2021.3.1 (202109091838)
XRebel:  (c) Copyright 2007-2021 Perforce Software, Inc.
XRebel:
XRebel:  For questions and support, contact support-rebel@perforce.com
XRebel:
XRebel: ################################################################
You will be able to activate the license once the application UI is displayed in the browser window. This popup will be shown:

XRebel Licensing Standalone
When you need to activate your licensing through command line (particularly useful for Docker environments), Rebel Licensing .. code:
-Dxrebel.license.url=Rebel Licenses Team URL
-Dxrebel.license.email=User Email Address
Local XRebel License File .. code:
-Dxrebel.license.file=/path/to/xrebel.lic
XRebel Trial
JRebel and XRebel now share a single 14-day trial.
Start your trial from the JRebel IDE plugin or trial signup form.
If you have a JRebel license through licenses.zeroturnaround.com, ask your account administrator to turn on the XRebel trial.
If you have any questions or issues, please contact support-rebel@perforce.com.
I have a license
If you already have a license, press the I have a license link at the bottom. The activation view will switch:
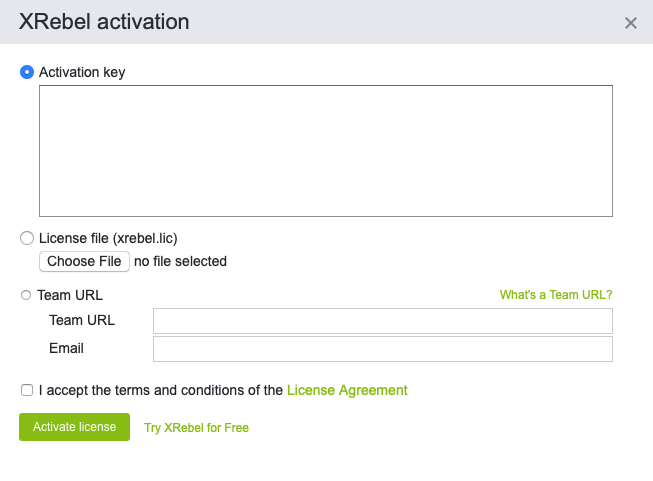
This view permits activating the product using the following methods:
Activation key – Use this option when you were given an activation key. Paste your license key in the text field and press Activate license.
License file (xrebel.lic) – Use this option when you were emailed a license file (
xrebel.lic). Browse to the license file and press Activate license.Team URL – Use this option when you activate using a License Server or License Management. Paste the Team URL (provided by your license service administrator) into the first field and specify your email in the second field. Press Activate license.
If you do not have a license code, press Try XRebel for Free. This will return you to the evaluation signup form (provided you have not evaluated the product before).
Tip
You can always review your current license status in Settings > About.
Refer to the Troubleshooting section if you have trouble with your license file.
Adding XRebel to your server
Having trouble getting XRebel to work with your application server? This chapter details the correct examples for how to add the JVM parameter to your server startup, using either an IDE or running your server without it.
Adding the XRebel parameter using an IDE
You can make your life a lot easier when you use an IDE. This section helps you add XRebel to your servers in Eclipse, IntelliJ IDEA, NetBeans and JDeveloper.
Eclipse
Tip
JRebel and XRebel for Eclipse is available for download. Learn more.
This set of instructions assumes that you have already configured a server to be used in your IDE. In this example we have a Tomcat 8.0 server present in Eclipse.
Open Run > Run Configurations…
Select the desired server from the left hand menu.
Open the Arguments tab on the right. You will be presented with this view:
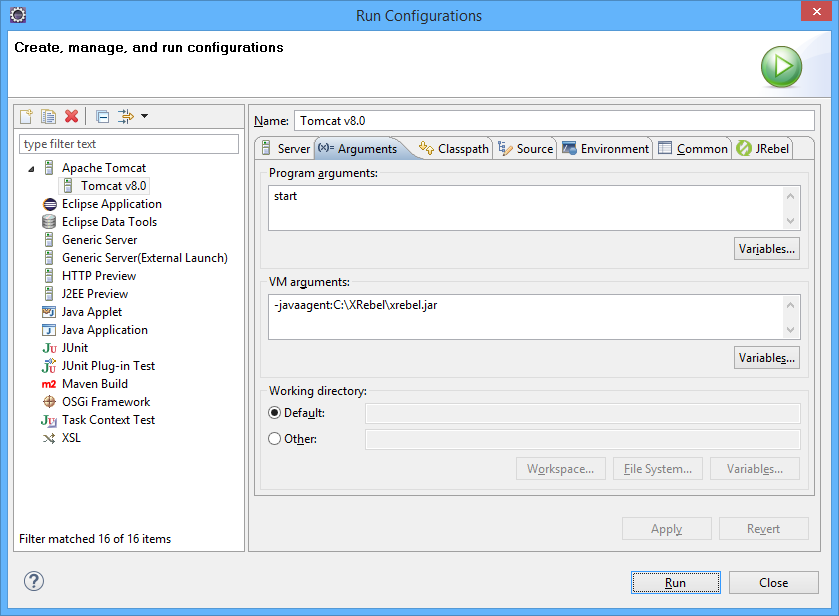
Add the following line under VM arguments:
-javaagent:[path/to/]xrebel.jar
Press Apply to store the configuration.
From here, you can either press Run to immediately run the new server configuration. If you defined the XRebel location successfully, you should see the XRebel banner in the server console immediately on startup.
IntelliJ IDEA
This set of instructions assumes that you have already configured a server to be used in your IDE. In this example we have a Tomcat 7.0 server present in IntelliJ IDEA.
Open Run > Edit Configurations…
Select the desired server from the left hand menu. You will be presented with this view:
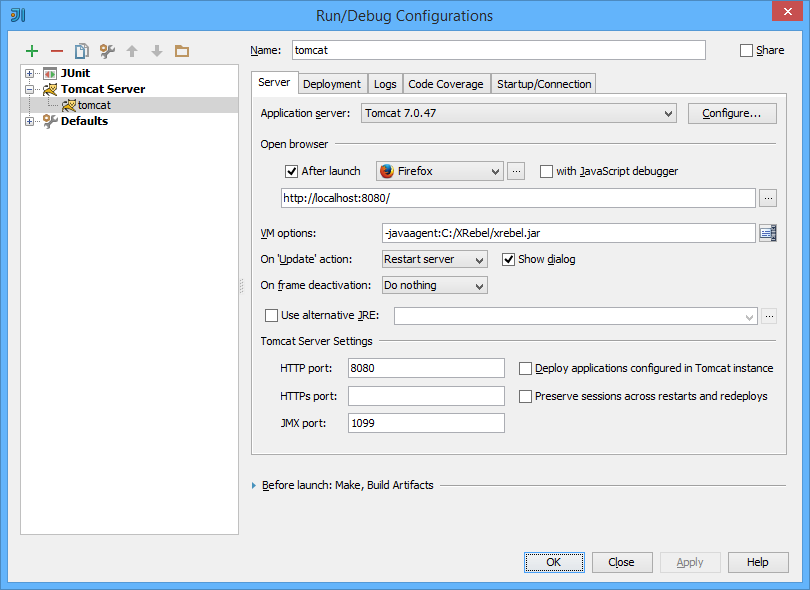
Add the following line in the VM options field:
-javaagent:[path/to/]xrebel.jar
Press Apply to save the changes. Press OK to save the changes and close the configuration window.
The next time you run the server with this configuration, XRebel is run with it. If you defined the XRebel location successfully, you should see the XRebel banner in the server console immediately on startup.
NetBeans
This set of instructions assumes that you have already configured a server to be used in your IDE. In this example we have a Tomcat 8.0 server present in NetBeans.
Open Tools > Servers.
Select the desired server from the left hand menu. Open the Platform tab on the right. You will be presented with this view:

Add the following line in the VM Options field:
-javaagent:[path/to/]xrebel.jar
Press Close to save the changes and close the window.
The next time you run the server, XRebel is run with it.
JDeveloper
This set of instructions assumes that you have already configured a server to be used in your IDE. In this example we have an embedded WebLogic server configured in JDeveloper.
Open Window > Application Servers.
Select the desired server from Application Servers pane. Right-click it and select Properties.
Access the Launch Settings tab.
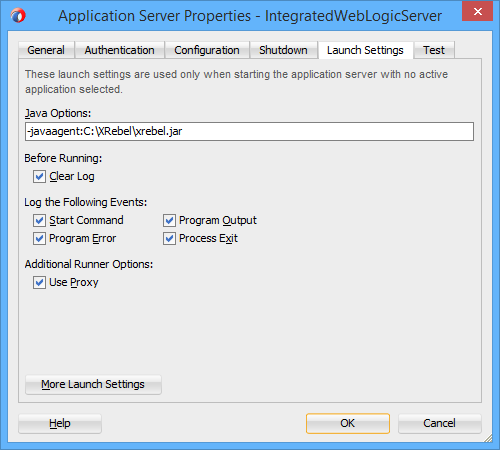
Add the following line in the Java Options field:
-javaagent:[path/to/]xrebel.jar
Press OK to save the changes and close the window.
The next time you run this server, XRebel is run with it.
Adding the XRebel parameter without an IDE
When running your application server without an IDE, you need to define the XRebel JAR within your server’s startup script. This chapter provides examples for servers that are supported.
GlassFish
Access your GlassFish Administration Console.
Open Configuration > JVM Settings > JVM Options.
Press Add JVM Option and insert the following:
-javaagent:[path/to/]xrebel.jar
Press Save and don’t forget to restart your server.
JBoss
JBoss on Windows
Access your JBoss home folder.
Open the
binfolder.Create a new executable, for example
run-xrebel.cmd.Add the following lines to this new executable:
@echo off
set JAVA_OPTS=-javaagent:[path/to/]xrebel.jar %JAVA_OPTS%
call "%~dp0\standalone.bat" %*
Note
Replace the link to the JBoss executable as necessary when using older JBoss versions.
Run this executable instead of your standard JBoss executable.
JBoss on Mac OS and Linux
Access your JBoss home folder.
Open the
binfolder.Create a new script, for example
run-xrebel.sh.Add the following lines to this new executable:
#!/bin/bash
export JAVA_OPTS="-javaagent:[path/to/]xrebel.jar $JAVA_OPTS"
`dirname $0`/standalone.sh $@
Note
Replace the link to the JBoss executable as necessary when using older JBoss versions.
Run this script instead of your standard JBoss executable.
JBoss Domain
Access your JBoss Domain configuration folder
JBOSS_HOME/domain/configuration.Open
configuration.xml.Locate your desired server group.
Add the following option to the configuration:
<jvm-options>
  <option value="-javaagent:[path/to/]xrebel.jar"/>
</jvm-options>
Save
configuration.xmland restart the server.
Jetty
Jetty on Windows
Add the following to the command line:
-javaagent:[path/to/]xrebel.jar
Run Jetty.
Jetty on Mac OS and Linux
Access your Jetty home folder.
Open the
binfolder.Create a new script, for example
jetty-xrebel.sh.Add the following lines to this new executable:
#!/bin/bash
export JAVA_OPTIONS="-javaagent:[path/to/]xrebel.jar $JAVA_OPTIONS"
`dirname $0`/jetty.sh $@
Run this script instead of of your standard Jetty executable.
Resin
Access your Resin home folder.
Open the conf folder.
Edit the
resin.propertiesfile. Locatejvm_args.Add the XRebel parameter:
jvm_args=-javaagent:[path/to]xrebel.jar
Save and restart your application server.
Note
Alternatively, you can include the XRebel parameter in the resin.xml file. To do this, add the following within the <server> tags:
<jvm-arg>-javaagent:[path/to]xrebel.jar</jvm-arg>
Warning
You only need to configure the JVM parameter once. Pick either the properties file or the xml file. Do not add the JVM parameter in both places.
Spring Boot
Add the XRebel parameter to Spring Boot startup:
java -javaagent:[path/to/]xrebel.jar -jar myapp-boot.jar
Spring Boot using Gradle
Add the XRebel startup parameter to the build script:
applicationDefaultJvmArgs = [ "-javaagent:[path/to]xrebel.jar" ]Start the application using
gradle bootRun.
Tip
You can also specify the startup parameter using JAVA_OPTS when using Gradle.
Spring Boot 1.x using Maven
Add the following to the Maven run command:
mvn spring-boot:run -Drun.jvmArguments="-javaagent:[/path/to/]xrebel.jar"
Spring Boot 2.x using Maven
Add the following to the Maven run command:
mvn spring-boot:run -Dspring-boot.run.jvmArguments="-javaagent:[/path/to/]xrebel.jar"
Tomcat
Tomcat on Windows
Access your Tomcat home folder.
Open the
binfolder.Create a new executable, for example
catalina-xrebel.bat.Add the following lines to this new executable:
@echo off
set JAVA_OPTS=-javaagent:[path/to/]xrebel.jar %JAVA_OPTS%
call "%~dp0\catalina.bat" %*
Run this executable instead of your standard Tomcat executable:
$ catalina-xrebel.bat run
Running Tomcat as a service? Open the tomcatXw.exe wrapper (double-click the Tomcat icon in your system tray). Insert the following line into the Java > Java Options text field:
-javaagent:[path/to/]xrebel.jar
Tomcat on Mac OS and Linux
Access your Tomcat home folder.
Open the
binfolder.Create a new script, for example
catalina-xrebel.sh.Add the following lines to this new executable:
#!/bin/bash
export JAVA_OPTS="-javaagent:[path/to/]xrebel.jar $JAVA_OPTS"
`dirname $0`/catalina.sh $@
Run this script instead of your standard Tomcat executable.
./catalina-xrebel.sh run
WildFly
WildFly on Windows
Access your WildFly home folder.
Open the
binfolder.Create a new executable, for example
run-xrebel.cmd.Add the following lines to this new executable:
@echo off
set JAVA_OPTS=-javaagent:[path/to/]xrebel.jar %JAVA_OPTS%
call "%~dp0\standalone.bat" %*
Run this executable instead of your standard JBoss executable.
WildFly on Mac OS and Linux
Access your WildFly home folder.
Open the
binfolder.Create a new script, for example
run-xrebel.sh.Add the following lines to this new executable:
#!/bin/bash
export JAVA_OPTS="-javaagent:[path/to/]xrebel.jar $JAVA_OPTS"
`dirname $0`/standalone.sh $@
Run this script instead of your standard WildFly executable.
WebLogic
WebLogic on Windows
Access your WebLogic home folder.
Open the
binfolder.Create a new executable, for example
startWeblogic-xrebel.cmd.Add the following lines to this new executable:
@echo off
set JAVA_OPTIONS=-javaagent:[path/to/]xrebel.jar %JAVA_OPTIONS%
call "%~dp0\startWebLogic.cmd" %*
Run this executable instead of your standard WebLogic executable.
WebLogic on Mac OS and Linux
Access your WebLogic home folder.
Open the
binfolder.Create a new executable, for example
startWeblogic-xrebel.sh.Add the following lines to this new executable:
#!/bin/bash
export JAVA_OPTIONS="-javaagent:[path/to/]xrebel.jar $JAVA_OPTIONS"
`dirname $0`/startWebLogic.sh $@
Run this executable instead of your standard WebLogic executable.
WebSphere
Windows
Start the IBM WebSphere server and open the administrative console.
In the Admin Console open Servers > Application servers. Select the server your application is deployed to.
Select Java and Process Management > Process Definition.
Select Java Virtual Machine.
Insert the following line into Generic JVM arguments for WebSphere:
-noverify -Xshareclasses:none -javaagent:[c:\path\to\]xrebel.jar
Press OK. When asked, save the master configuration and restart the server.
Linux and Mac OS
Start the IBM WebSphere server and open the administrative console.
In the Administration Console open Servers > Application Servers. Select the server your application is deployed to.
Select Java and Process Management > Process Definition.
Select Java Virtual Machine.
Insert the following line into Generic JVM arguments for WebSphere:
-noverify -Xshareclasses:none -javaagent:[/path/to/]xrebel.jar
Press OK. When asked, save the master configuration and restart the server.
WebSphere Application Server Liberty Profile
To run XRebel, you need to specify the JVM argument in the JVM_ARGS environment variable before you launch the startup script:
Run the JVM arguments setting command using the server command line:
When using Mac OS or Linux:
export JVM_ARGS="-javaagent:[path/to]xrebel.jar"
When using Windows:
set JVM_ARGS=-javaagent:[path/to]xrebel.jar
Launch the server.
When you start your application server with this argument configured, XRebel is loaded at startup.